Steps to Deployment
Whether snubbers and bridles are considered adjunctive to ground tackle systems or as core components, these devices do NOT replace best practices for anchoring. Yes, snubbers and bridles improve holding in many situations like short scope and/or high winds, but the benefits are lost if the chain is piled atop an unset anchor. Follow steps as per usual for setting the anchor and deploy the snubber or bridle late in the anchoring routine. During or after drift check is ideal.
Note: I've seen many boats deploy a snubber or bridle before the anchor is set and using it as part of the setting process. A couple of comments, then I'll leave it. Using a snubber or bridle to set the anchor with a good punch in reverse can generate high loads on the snubber - bridle lines which reduces the lines' strength and useful life. Secondly, nylon line can fail catastrophically which generates significant energy and recoil that can injure crew on the bow. It seems using a hardware chain stopper to set the anchor is probably the better option.
Assuming the anchor is set, here are the steps:
- Fake the snubber or bridle line(s) onto the foredeck while continuing to check for drift
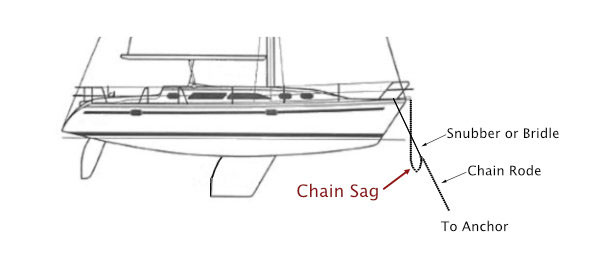
- Attach the hook or tie the line to the chain forward of the windlass. If the hook doesn't pass through or over the bow roller assembly, lift it over as it's paid out, or attach the hook forward of the bow roller
- While holding some tension on the snubber - bridle line(s), veer additional chain rode to the desired snubber or bridle line length
- Once you reach the desired snubber - bridle line length, position the lines and anti-chafe and secure the lines to the boat
- For a snubber, if you position the line over the bow roller adjust the anti-chafe to cover all areas where friction might occur. These include deck hardware between windlass and bow roller, the bow roller assembly and where the line contacts the chain on the bow roller. It's best to have a foot or more of anti-chafe off the forward end of the bow roller to prevent chafing in the event of pitching. Make the boat end of the snubber line to a cleat, bitt or post on the deck. Consider letting the lines run freely through the anti-chafe (this reduces any sawing that might occur between anti-chafe and deck hardware).
- For a bridle, route all lines to ensure a clear and direct path to bow chocks and mooring hardware. Position the anti-chafe through chocks and around cleats, bitts, posts or other areas of friction and make the bridle line fast. Consider fixing the anti-chafe to the lines (i.e. securing the anti-chafe to the line so the line does not move freely inside the anti-chafe).
- Veer additional chain until the section of chain above the hook sags below the hook (see image below). Use 10% of the deployed snubber - bridle leg length divided by 2
to estimate chain sag (e.g. 20' line deployment needs 2' of total chain slack which is 1' of sag; yes, you can use 5% of deployment length if that's easier). If you
can't see the hook, pay out just enough chain above the snubber hook to make it slack, then eyeball measure the chain rolling off.
These lengths are suggestions and serve as a starting point only. Consider vessel weight and windage as well as current and forecasted conditions
and apply common sense. The goal is to have the chain slack be slightly greater than snubber - bridle line stretch to prevent snatch
loads when the chain tension increases.
- Set the hardware chain stopper
- Bump the windlass to unload it
How Much to Deploy
Sizing an anchor snubber or bridle is one can of worms and how much to deploy is another. I use the "will I sleep soundly tonight" methodology when settling in for a cocktail after anchoring. If the answer is no, is it anchor related (set, scope, swing)? Or, is it bridle related? If the latter, I deploy more bridle line insofar as the anchoring location and conditions allow. Here are the basic rules of thumb I use for our monohull sailboat (assumes I'm happy with set and scope; conditions can cause variances to deployment lengths below):
- 15' - 18' is the default deployment. If the bay is calm as a mill pond, out goes 15' - 18'.
- If the current or forecasted wind speed is 10 - 20 knots, desired deployment is 20' - 25'.
- If the current or forecasted wind speed is between is 20 - 30 knots, desired deployment is 30' - 35'
- If the current or forecasted wind speed is greater than 30 knots, it's full deployment (50') with adjustments to improve motion
- If we leave the boat, I add leg length - conditions dictate how much additional line is paid
- Longer deployments on catamarans are important; see the Catamaran Anchor Bridles page for details
- As mentioned above, chain slack (distance from hook to trough of sag; see illustration above) is roughly calculated at 10% of leg length divided by 2 (yes, that's 5%).
Again, these are general rules of thumb that have served me well up to 50 knots (never been out over 50 knots); boat weight, conditions and bridle line diameter size will affect line deployment values.
Swell Deployment
When wind and swell are coming from different directions, the boat often needs to be oriented for more comfortable motion. Swell on the beam can be nauseating for even the most sea-hearty. The most common methods involve setting a second anchor or deploying a bridle.
For the bridle method, here are the general steps:
- Rig the bridle as per usual except attach the swell side line to the bow cleat opposite the swell; pay out more than a ~10 ft / 3 m of bridle line
- Make the other leg to a non-swell-side cleat astern or midship (stern is optimal if the line is long enough). For sailboats, use the aft-most winch instead of a cleat if possible for easy adjustments to orientation.
- Slowly pay out chain rode until the aft-most leg is loaded.
- Give the boat a few minutes to re-orient. Adjust the aft-most leg to bring the bow more head-to-swell as needed for comfort.
- Once optimal orientation is achieved, pay out additional chain rode to load the bridle line.
Tips to Improve Comfort
- To reduce excessive veering (yaw), shorten or lengthen one leg of the bridle to make the legs unequal. Adjust as necessary but small adjustments are best to prevent tacking on the rode.
- When tidal current is perpendicular to the wind, I usually shorten the leg leeward the current first which turns the bow more to current. Again, small adjustments are good.
- Excessive pitching? Shorten the leg(s) but not so much the rode becomes taut as the vessel pitches.
- If the bridle lines are unequal in length and the boat pitches, you'll often get yaw. Equalizing the lines should improve the motion. I know, I know, isn't this the opposite of what I recommended in #1 above? Yes and no. When the boat moves like this, you just have to strike a balance. Hey, the motion might not allow for wine in stems, but wine from coffee cups ain't so bad.
- Excessive surging (rubber band effect)? Shorten the leg(s).
- Wind increases, or forecast to increase? Pay out more snubber or bridle line(s) and veer more anchor chain if swing permits.